Skip to content
 What Are the Types of Woodworking Cuts? A Complete Guide
Being great at woodworking involves a good number of things, of which includes possessing great skill, accuracy, and knowledge of the tools and materials you use. The most important of this skillset is being able to identify the various types of woodworking cuts and when it is best to apply each one.
Are you a professional cabinet maker in a workshop, a custom furniture designer who makes one-of-a-kind pieces, a procurement manager for a large-scale production plant, or a dedicated craftsman who simply wants to improve their skills?
This article helps you to break down all the must-know woodworking cuts. After reading this, you will not only have knowledge of these woodworking cut types, but also know how to pick the best cuts for your project.
Basic Types of Woodworking Cuts: Woodworking Cuts for Every Beginner
Before venturing into more complex designs and intricate joinery, the first type of woodworking cuts every woodworker must master, is the basics. These basic types of woodworking cuts are the ones most used in every workshop, they are the foundational cuts that form the base on which every woodwork project is built.
1.Crosscut
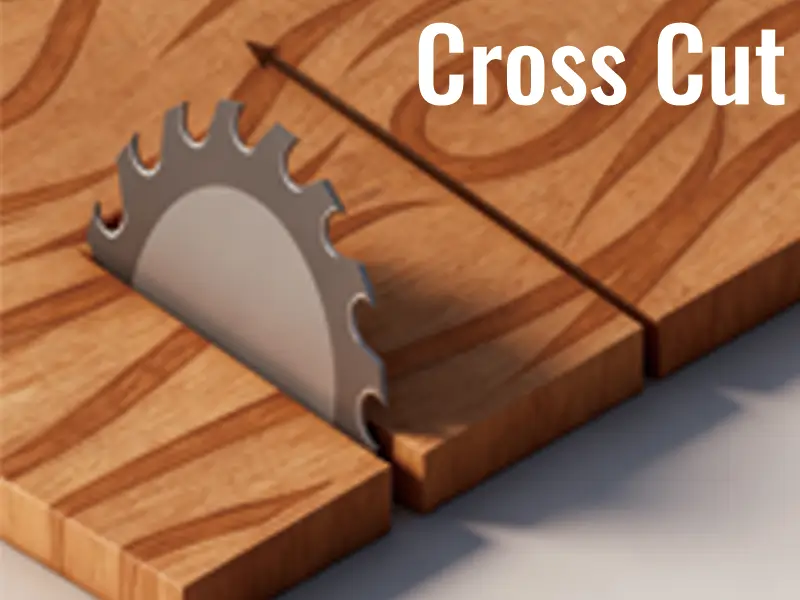
One of the first things that every woodworker learns is how to do a crosscut. This type of cut goes straight across the board’s grain. Similar to cutting a loaf of bread in half, but in this case you are cutting through the wood fibers at a right angle. The crosscut method is usually the first step in turning raw wood into manageable, usable pieces for any project.
Main Uses of Crosscut
- Building walls
- Basic carpentry
- Cutting boards to the right length
- Making parts for furniture and cabinets.
Tools to Use
- Hand saws
- Miter saws
- Table saws with a miter gauge or crosscut sled.
Pros | Cons |
If done correctly, and with a sharp blade, it makes clean, smooth lines with little tear-out. | The tool, like a miter saw, often limits the width of the cut. |
It is the most effective way to cut wood to the exact length you need. | Without the right support and a sharp blade, the side of the cut leaving the body can chip or “tear out.” |
2.Rip Cut
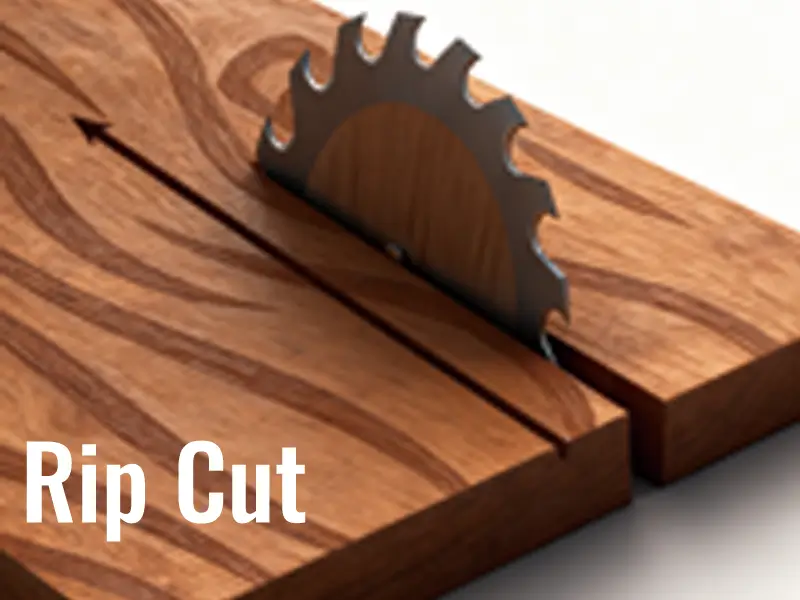
A rip cut is the opposite of a crosscut. It is a straight cut along the length of the wood, against the grain. This cut is a primary method typically used in reducing the width of a board. Rip cuts are an essential part of cabinetry and flooring, and other projects that require you to adjust the width of the wood.
Main Uses of Rip Cut
- Making face frames for furniture
- Making Flooring planks
- Making cabinet panels of different sizes
- For changing the width of a board.
Tools to Use
- Table Saw (the best tool for making rip cuts)
- Band saw
- Circle saw (with a guide or fence)
- Rip saw
- Hand saw
Pros | Cons |
It is the fastest way to cut bigger boards into narrow ones. | If not done correctly, it could be dangerous because of the kickback risk on a table saw. This can also happen if the blade is dull or the feed rate isn’t steady. |
Rip cuts give you very smooth and clean cuts, following the natural grain of the wood. | — |
3.Bevel Cut
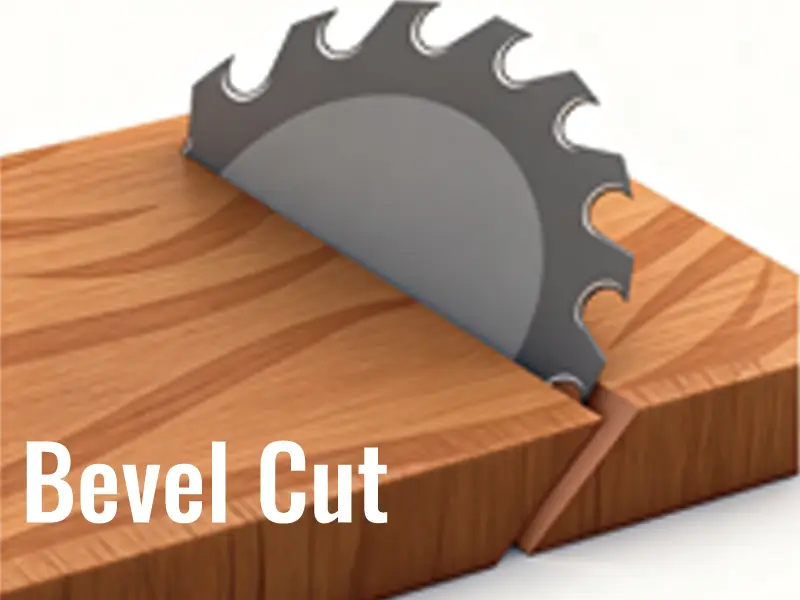
A bevel cut is a type of woodworking that is used to create an angle that is not 90 degrees to the face of the board like a crosscut or rip cut. It is designed for safety and wear resistance. Instead, it is done at a different angle, like 45 degrees. You can make a bevel cut by cutting at this angle through the thick part of the wood. This gives the cut an edge that slopes, which is necessary for making woodwork parts that aren’t straight.
Main Uses of Bevel Cut
- Making angled joints for structures with multiple sides, like pots or boxes
- Trimming edges for a decorative look
- Getting edges ready for seamless corner joinery in furniture and molding.
Tools to Use
- A table saw with a tilted blade
- A compound miter saw
- A power saw with a movable base plate are all common tools.
Pros | Cons |
It has a beautiful aesthetic | Not having properly calibrated tools can make it hard to get an exact and consistent angle |
Bevel cuts makes things safer by getting rid of sharp 90-degree corners | Any slight error in the angle can cause gaps in the end joint |
It lets you make strong and stable mitered joints when you put two beveled pieces together | — |
4.Miter Cut
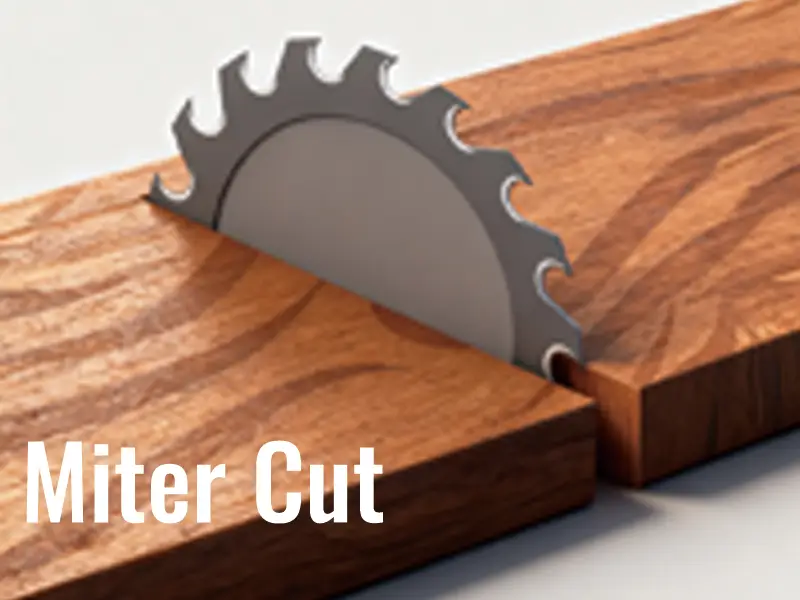
People often mix up miter cuts with bevel cuts. A miter cut is an angle cut made across the wood’s surface. In a miter cut, the blade stays straight (at 90⁰ to the wood’s surface), but it cuts at an angle. For perfect 90-degree corners, 45⁰ is the most typical miter angle.
Main Uses of Miter Cut
- For picture frames
- Crown molding
- Door and window trim
- Projects that require two pieces of wood to fit together perfectly at a corner.
Tools to Use
- Miter saw (primarily).
- Table saw with a miter gauge for making perfect miter cuts.
Pros | Cons |
Miter cut makes it easy to make straight angled cuts over and over again if you have the right tools | It can get out of alignment if the wood isn’t held firmly or if the saw blades isn’t perfectly set up |
The best way to make corners look clean and professional | Not the best tool for cutting long planks or ones wide at an angle |
Specialized Types of Woodworking Cuts: The Next Level
After mastering the basic woodworking cut types, it is ideal to now move on to the next level, understanding specialized cuts. This class of woodworking cuts open up new possibilities in joinery, functionality, and design. In this section, we will get you familiar with the more advanced types of woodworking cuts. While they may require greater precision, and sometimes, specialized tools, these woodworking cuts are what separate standard work from true craftsmanship.
1.Compound Cut
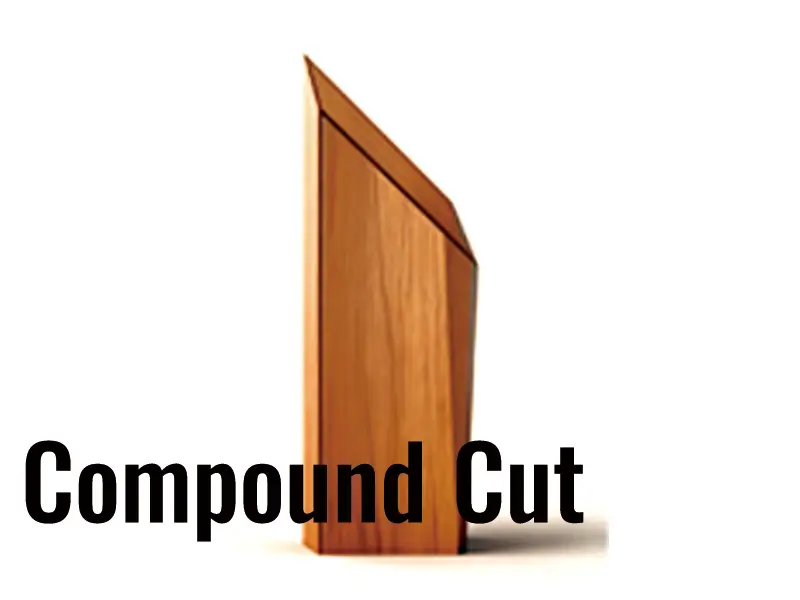
In one pass, a compound cut combines both a miter cut and a bevel cut, forming an advanced technique. This type of woodwork cutting is ideal for making joints that meet at corners that aren’t square on more than one axis.
Main Uses of Compound Cut
- Putting up crown molding (especially in corners that aren’t 90 degrees)
- Create complex geometric shapes like pyramids
- Making hopper-style containers with sides that slope.
Tools to Use
- A sliding compound miter saw
- Table saw with a specialized jig.
Pros | Cons |
It lets you create very complicated and accurate angles for unique projects. | It’s typically hard for beginners to set up right, as the complex angles require careful calculation to figure out |
Offers excellent decorating in a single, efficient cut | The slightest error can result in wasted material and joints that don’t fitting properly |
2.Plunge Cut
The plunge cut allows you to start cutting right from the middle of a piece of wood, instead of from the edge. The blade is plunged directly into the surface of the material and then moved to make a hole. This is an essential tool for making internal holes.
Main Uses of Plunge Cut
- Making slots for joinery
- Creating holes for electrical outlets or sinks
- Inlay work
- Starting internal cutouts for decorative designs.
Tools to Use
- A plunge router
- Track saws and oscillating multi-tools
- A jigsaw (can be used after making a small hole).
Pros | Cons |
It’s very useful for making cutouts without edges | If you don’t have full control of the tool, it can be dangerous (kickbacks,) |
Essential for different types of joinery and custom fits | — |
3.Jigsaw Cut (Curve Cut)
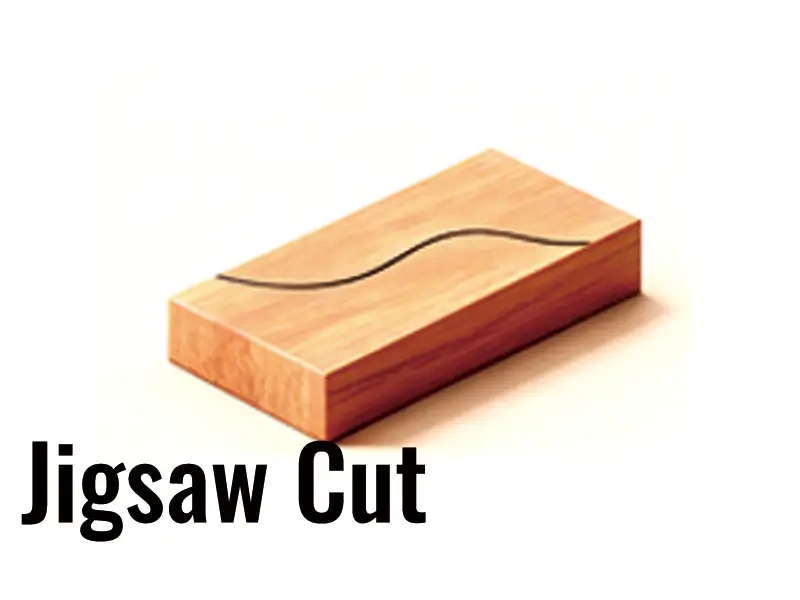
With a jigsaw, you can cut wood into all kinds of bent and odd shapes. The small, rotating blade of a jigsaw lets it get around tight corners and reach angles in complicated shapes that other saws can’t.
Main Uses of Jigsaw Cut
- For decorative scrollwork
- Making custom-shaped furniture parts
- Artistic woodworking
- Making sink or other fixture cuts.
Tools to Use
- A jigsaw (primary tool)
- A band saw.
Pros | Cons |
Very flexible for making cuts that don’t follow a straight line | It is very difficult to get a line that is perfectly straight. |
It is not too hard for beginners to use. | When cutting through thick wood, the blade may shift, making a cut that isn’t perfectly straight across the surface |
4.Mortise and Tenon Cut
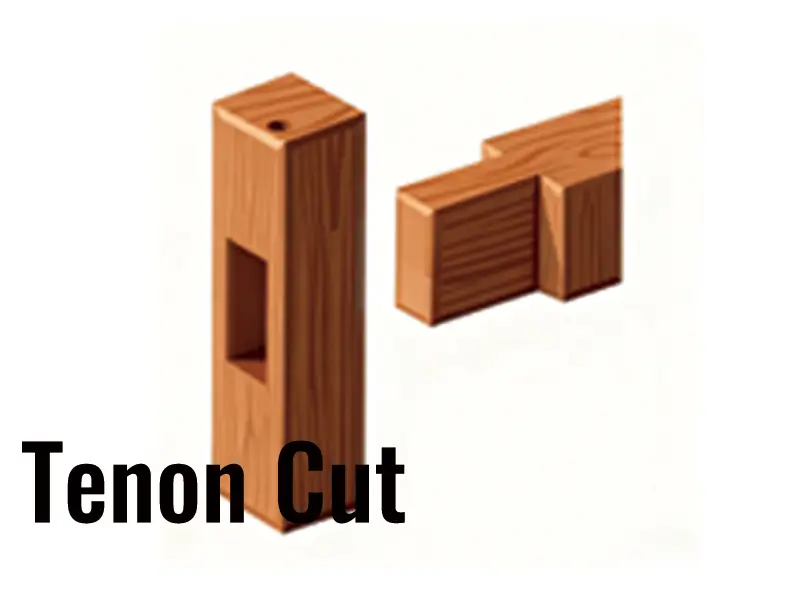
The mortise and tenon is a classic and very strong way to join two pieces of wood together. To do this, you have to cut a mortise (a rectangular slot or hole) in one piece of wood and a tenon (a projecting tongue) on the other piece that fits perfectly into the mortise.
Main Uses of Mortise and Tenon Cut
- Making frames for tables, chairs, doors, and beds that are strong and last a long time.
Tools to Use
- A dedicated mortising machine
- Drill press with a mortising tool
- Table saw (for Tenon)
- Band saw (for Tenon)
- Chisels and hand saws (for traditional methods).
Pros | Cons |
Creates an exceptionally large mechanical joint that is very strong and stable and can last for a long period of time | A high degree of precision and accuracy is needed to measure, mark, and cut. You must be very accurate |
It is both highly functional and aesthetically pleasing to the eye | It is not beginner-friendly |
Conclusion
By understanding the different types of woodworking cuts, you have taken the first step towards transforming your creative vision into a solid, high-quality product. From simple cross-sections and longitudinal cuts to complex mortise and tenon joints, each cutting technique serves a specific purpose in your woodworking project.
The next and most crucial step is investing in the right high-precision tools, you can improve production output while also ensuring a safer working environment.
Ready to take your brand to the next level with tools that guarantee unparalleled precision and durability? Explore the Sundi Precision Tools catalog and contact our team of seasoned experts to find the perfect cutting solutions for your workshop.
FAQs
Q: What is the difference between a rip cut and a crosscut?
A: A rip cut is made along the length of the wood, parallel to the grain, to reduce the width of the board. On the other hand, a crosscut is made transversely to the wood grain. This is done to shorten the length of the board.
Q: Are there other woodworking cut types?
A: Yes there is more, we focused on the most used and efficient ones. Other Woodworking cut types include half lap joints, groove cut, dado cut, dovetail, etc.
Q: What are the most important safety tips for cutting wood?
A: Ensure you always have safety glasses on to protect your eyes from debris. Avoid using the wrong blades for the type of cut you are making.
Q: Where can I get durable, cost-effective tools for cutting?
A: You can get tools for cutting from Sundi Wundi, a global leader in the manufacturing of premium quality tools for woodworking.